I was inspired to build this recumbent tricycle by the youtuber; Fun For Louis when he did a charity bike ride back in April (2018) from London to Africa. He decided to ride a recumbent trike instead of a regular bicycle and it reminded me of when I was back in high school and I helped my workshop teacher build and race a recumbent trike and how much fun they are to ride! I'm trying to organize a charity bike ride along with some friends around the state of Tasmania Australia, where I live, for the Cancer Council which I have some involvement with.
As with all my projects, I wanted to do this on the cheap, so I put an ad on Gumtree looking for free bikes and parts. To my surprise I got a few responses from people wanting to get rid of quite a few bikes and I ended up with a big pile of them as you can see. I did also buy a couple of slightly better ones from the tip-shop just to get some better parts, but they weren't very expensive at all.
I did end up doing something with the left over bikes (of which there were a lot) I made them into garden ornaments to sell, so I've actually made back more money from that than I put into the trike!
The first thing I did was to lay out the rough position of everything to get some dimensions to work off of. Then I made a simple CAD model to work out what angles I wanted for the steering geometry.
Luckily I had two of the same model of bike in my pile so I used the head tubes from them for the kingpins as I knew they'd be the same. This picture was taken after the head tubes had been cut off the frames, and the forks had been cut off the steering tubes.
I had to drill a hole through the bottom of the steering tubes for the axle to go through. As you can see, this hole is at an angle. In steering geometry jargon, this is called the 'included angle', which is the camber angle plus the 'steering axis inclination' (or SAI ). I decided to have 3 degrees of negative camber and 17 degrees of SAI. This gives an included angle of 14 degrees. In hindsight though I would have gone with a lot more SAI, more like 30 degrees if not more. This would be more similar to the commercially made recumbent trikes. Incidentally, it has about 12 degrees of caster and just a hint of toe-out, I don't know what the exact amount is though.
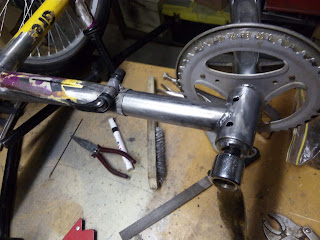
All the tubes were estimated and hand notched.
Most of the frame welded together.
The tube at the front is adjustable in length.
Here the steering arm is attached, it's welded on very solidly because it's what the steering rod attaches to and it also has the handle bars and front brakes mounted to it. You can also see the end of the axle and the piece I welded on around the hole so that the nut on the end of the axle has a flat face to tighten up on. This is how the front axles have enough strength being in only single-sheer as opposed to double-sheer. It utilizes the strength of the axles in tension rather than bending force.
A simple jig to hold the axles in line.
Here is the steering rod attached. I bought some ball joints (rose joints) online including ones with a left hand thread. So to adjust the length of the steering rod, and therefore the toe setting, the rod can be rotated, rather than having to take one ball joint off and screwing that in or out.
I would have liked to use disc brakes on the front but the budget simply didn't allow for that so I used the best and lightest set of rim brakes I had from my bike pile. They don't increase the width by much and they work okay so they'll do.
The beginnings of the seat frame. You can also see the handlebars here.
I had to weld lots of little eyelets on the seat rails for the thin rope which forms the support of the seat.
For joining some of the longer and more unusual cables I used the metal bits out of an electrical terminal connector block, they're small, light and actually work surprisingly well!
I had to make some custom cable end holders that would be large enough to weld.
After sanding and primer, I painted it hammertone silver.
Final assembly.
And here is the finished trike. On the first ride there were a few reliability issues but I should be able to fix them quite easily. Overall it went really well and it was so much fun! One day I might build another one incorporating all of the lessons from this one, but for now I've got plenty more ambitious creation projects.


